Using Streamlit to Build a Production-Ready Llama 3 Chatbot
What is Llama 3?
Meta Llama 3, developed by Meta, is an advanced language model trained on extensive text data. This training enables it to effectively understand and generate language, making it ideal for tasks such as creating various types of creative content, translating languages, and providing informative answers to questions. You can learn more about it here.
What is Streamlit?
Streamlit is a free, open-source Python library that allows users to create and share web apps for data science, machine learning and AI applications. You can learn more about it here. We’re also using the Streamlit Extras library. You can find the documentation for it here.
About the Application
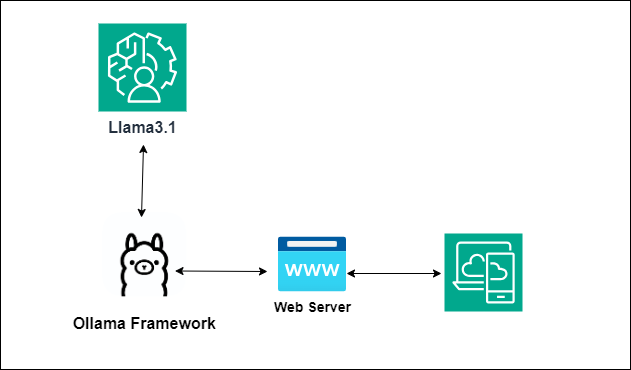
We’re building the application in Python and using the LangChain framework to build our chatbot. We’ve got data ingested into the Pinecone vector database. The ingested data was embedded using the OpenAI Embedding Model. We’re also using Llama 3 which is hosted at DeepInfra. And finally, we’ve got our sleek and light UI built using Streamlit.
Here’s a breakdown below:
Language: Python
Library: LangChain
Vector Database: Pinecone
LLM: Llama3 (DeepInfra)
Embedding Model: OpenAI (text-embedding-3 -small)
UI: Streamlit
For the Streamlit app to come to life, we have to give it a proper page structure. So we have the app.py file where the flow begins. This is our home page in some sense. From here, we move onto a selection page, which demonstrates how routes are used and how states are managed. Finally, we reach the chatbot.py file which hosts our wonderful chatbot. We’ll examine these files in order.
app.py
import streamlit as st
from streamlit_extras.switch_page_button import switch_page

st.set_page_config(initial_sidebar_state="collapsed")

st.title("Welcome to the AI Playground")

if st.button("Proceed"):
    switch_page("selector")
The app.py is the one that we’ll be running first using the following command: streamlit run app.py. This will run the application in your browser. The code above is fairly simple. We first set the sidebar to initiate in a collapsed manner. This is purely for UX and does not affect functionality. Then we add in our title. The final bit is interesting. We’re using the streamlit_extras library to use this function called switch_page(). This helps to move onto the next page of the app while maintaining context.
selector.py
import streamlit as st
import time
from streamlit_extras.switch_page_button import switch_page

st.set_page_config(initial_sidebar_state="collapsed")

system = ""

st.title('AI System Selector')

st.write('Please choose one of the systems below:')

button_one = st.button('System One')
button_two = st.button('System Two')
button_three = st.button('System Three')

if button_one:
    st.write('You chose System One!')
    system = "System One"
    time.sleep(1)
    if 'system' not in st.session_state:
        st.session_state['system'] = system
    switch_page("chatbot")
elif button_two:
    st.write('You chose System Two!')
    system = "System Two"
    time.sleep(1)
    if 'system' not in st.session_state:
        st.session_state['system'] = system
    switch_page("chatbot")
elif button_three:
    st.write('You chose System Three')
    system = "System Three"
    time.sleep(1)
    if 'system' not in st.session_state:
        st.session_state['system'] = system
    switch_page("chatbot")
The selector is our second page. It is made this way to demonstrate how routes can be handled in Streamlit. We initiate the variable called system. After that, we define three buttons. You can see that according to the button pressed, the value in the system is set accordingly. After a wait of 1 second (again, added for the UX), the user is directed to our final page called chatbot. It is also important to note that pages are just files when it comes to Streamlit and all of the page files must be defined inside a pages directory at the root of your project.
chatbot.py
import streamlit as st
from chatbot_inference.chatbot_version_one import query_processor

st.set_page_config(initial_sidebar_state="collapsed")

st.title("AI Chatbot")

if "messages" not in st.session_state:
    st.session_state.messages = []

for message in st.session_state.messages:
    with st.chat_message(message["role"]):
        st.markdown(message["content"])

prompt = st.chat_input("Enter question here")
if prompt:
    with st.chat_message("user"):
        st.markdown(prompt)

    st.session_state.messages.append({
        "role": "user",
        "content": prompt
    })

    system = st.session_state['system']

    with st.chat_message("assistant"):
        message_placeholder = st.empty()
        response = query_processor(prompt, system)
        message_placeholder.markdown(response)

    st.session_state.messages.append({"role": "assistant", "content": response})
The final page is most intriguing because this is where we are handling the chatbot mechanism. We are using the st.session_state to not only get the system value we stored in the previous page but we’re also using it to maintain a history of messages. st.session_state.messages is initialised and then each new message from the user and the assistant is added to that list. Adding the user’s message is fairly simple, just add into whatever is typed. Getting the assistant’s response, however, is a different story. For the assistant, we will be calling a function that we made and the response will be added to the message_placeholder. We will look into that function below.
query_processor(query, system)
from pinecone import Pinecone
import os
from langchain_openai import OpenAIEmbeddings
from langchain.chains.question_answering import load_qa_chain
from langchain_community.llms import DeepInfra
from langchain_community.chat_models import ChatDeepInfra
from langchain.memory import ConversationBufferMemory
from langchain.prompts import PromptTemplate
from langchain.callbacks.streaming_stdout import StreamingStdOutCallbackHandler
from langchain_pinecone import PineconeVectorStore

def query_processor(query, system):
    # Set up Pinecone index
    index = "index-name"
    os.environ["DEEPINFRA_API_TOKEN"] = ""
    os.environ["OPENAI_API_KEY"] = ""
    os.environ["PINECONE_API_KEY"] = ""

    pinecone = Pinecone(api_key="")
    llm = DeepInfra(model_id="meta-llama/Meta-Llama-3-70B-Instruct")
    llm.model_kwargs = {
        "temperature": 0.7,
        "repetition_penalty": 1.2,
        "max_new_tokens": 250,
        "top_p": 0.9,
    }

    chat_llm = ChatDeepInfra(
        model="meta-llama/Meta-Llama-3-70B-Instruct",
        streaming=True,
        verbose=True,
        callbacks=[StreamingStdOutCallbackHandler()]
    )

    # Set up OpenAI Embeddings model
    embedding_model = OpenAIEmbeddings(model="text-embedding-3-small", dimensions=1536)

    # Load Pinecone index and create vector store
    vector_store = PineconeVectorStore(index_name=index, embedding=embedding_model)

    # Initialize conversation memory
    memory = ConversationBufferMemory(
        memory_key="chat_history",
        input_key="question",
        return_messages=True
    )

    # Define template for prompts
    template = """You are a helpful assistant

    CONTEXT:
    {context}

    SYSTEM:
    {system}

    QUESTION:
    {question}
    """

    # Create prompt template
    prompt = PromptTemplate(
        template=template,
        input_variables=["context", "question", "system"]
    )

    vector_query = "Query: " + query + " System: " + system

    # Perform similarity search in vector store
    input_documents = vector_store.max_marginal_relevance_search(vector_query, k=2, fetch_k=15)


    # Load question answering chain
    chain = load_qa_chain(
        llm=chat_llm,
        chain_type="stuff",
        memory=memory,
        prompt=prompt,
        verbose=True
    )

    # Run the chain with input documents and query
    response = chain.run(
        input_documents=input_documents,
        question=query,
        system=system
    )

    return response
This is where the magic happens. We first initiate our index and API keys. We then load the Llama 3 model from DeepInfra. We then start up our Embedding model from OpenAI. After that, we add our prompt where we add our placeholder for system. This is done to demonstrate how we can add our variables to the prompt. We then use the ChatPromptTemplate to get our prompt ready. Once that is done, we will run the relevance search from Pinecone to get our input documents. Finally, we load our chain and then we run it to get our response. In the chain, we must specifically add system and pass in our value for the placeholder to be filled with our value.
Takeaways
One of the best things about Streamlit is how easy it is for us to develop UIs for any of our AI applications. At the same time, Streamlit also lets you deploy your applications to their community cloud. Other than that, I believe it is possible to develop much more complex UIs with Streamlit and it is a cool technology to explore. Finally, to see the application in action, click here.
Thank you for reading!